
Tuesday, December 28, 2010
All I Want for Christmas...
is this kitchen to be done. That, however, was not meant to be.
We primed the ceiling and walls last night and the night before and contractor-father-in-law made the opening between the dining room and kitchen and laid the subfloor this week. Progress! It's being made! Hopefully, we'll be talking about cabinets here in like two weeks.
Unfortunately for me, my little camera card reader doohickey has died a horrible, horrible death, which means I can not get any pictures off my camera to show you the opening or the walls. Sad!
I need to pick up another one this week. Today, we got paint samples for the trim and more paint to fix up the dining room wall and potentially paint the kitchen. (The same bamboo shoot green as the rest of the downstairs.) More details when I have the actual pictures.
In the meantime, my awesome husband got me How to Survive a Garden Gnome Attack: Defend Yourself When the Lawn Warriors Strike (And They Will) for Christmas. Attack Gnomes! Awesome!
I am thinking about getting this this growth chart to hang up somewhere in the kitchen. My parents would measure us when we were growing up on various walls in various kitchens, but we moved every three or four years, so I kind of like the idea of something we can take with us. Not that I am going anywhere, when this kitchen is done.
In any case, we had a great holiday, and I hope you all did, too!
Read more >>
We primed the ceiling and walls last night and the night before and contractor-father-in-law made the opening between the dining room and kitchen and laid the subfloor this week. Progress! It's being made! Hopefully, we'll be talking about cabinets here in like two weeks.
Unfortunately for me, my little camera card reader doohickey has died a horrible, horrible death, which means I can not get any pictures off my camera to show you the opening or the walls. Sad!
I need to pick up another one this week. Today, we got paint samples for the trim and more paint to fix up the dining room wall and potentially paint the kitchen. (The same bamboo shoot green as the rest of the downstairs.) More details when I have the actual pictures.
In the meantime, my awesome husband got me How to Survive a Garden Gnome Attack: Defend Yourself When the Lawn Warriors Strike (And They Will)
 |
| Looking very innocent, isn't he? |
I am actually wondering if my red/white/green thing I end up having in the house is really gnome related and not very woodland-ey at all.
In any case, we had a great holiday, and I hope you all did, too!
Thursday, December 23, 2010
How we bought our house
A friend at work recently asked me for advice about buying a house. Although I have only purchased 2.5 houses in my life, I am full of advice for a few key reasons.
Read more >>
- I am an irritating know-it-all/ex-librarian who over researches everything.
- I just got done buying basically the house my friend was looking for, so I knew what I did.
- My parents bought and sold houses (and in some cases still do) to make their livings my whole growing-up life.
|
| This gnome has nothing to do with anything, except that I love gnomes and he's in my yard. |
Another friend who lives in Finland recently advised me to buy an apartment in Estonia. Sorry, pal, I have no immediate plans to procure an apartment in Estonia, but apparently they are going on the Euro in 2011. His belief is that he will buy now, and then their economy will shoot up over the next year, making his purchase worth heaps more than he paid. I wish him luck! I do not think my husband would be amused if I bought an apartment in Estonia.
In any case, I thought I would babble on here a bit about how we went about buying our current house, which was a much more organized deal than our first house, which was basically:
- Mom called me, told me a house was for sale across the street.
- Husband looked at it and told me not to buy it while he was at a conference.
- I met the owner and agreed to buy it while husband is at said conference.
I should also point out that I am not a real estate agent or any sort of financial professional, so this is all me babbling about what I thought and did, and not meant to be anything other than that.
In the current house, I spent a good long while figuring out what we were looking for. It came down to wanting to be in a good school district, a neighborhood that's walkable to useful stuff, not on a street with any double yellow lines.
After going to like fifty open houses and viewings that was amended to add "cheap enough that we can put in a new kitchen". It turns out that, as someone who loves to cook and bake, I am EXTREMELY picky about kitchens and there were plenty of newly renovated kitchens for sale that were laid out poorly, did not have enough counter space, or otherwise just did not work for me.
So, really, knowing what you are looking for is step one.
Step two turns out to be knowing what I was comfortable spending. I point this out because the bank and your real estate agent and the internet will ask you some questions about your income and your debt and give you a figure that represents "what you can afford to spend". In my experience, that number is super high! We live in an area where home prices are thankfully low, so if you are in California or New York you might have a different philosophy about this. We basically took the amount they said we could afford, and chopped it roughly in half. That number got us to where we could put 20% down, not need an FHA mortgage and have a monthly payment that is about what our old monthly payment was. It also gave us a good estimate of "how much we can afford to spend on the addition", but I won't even tell you how well that worked out, because that budget is long blown. But hey! This is a post about buying a house, not staying on budget while building a huge kitchen.
The last step, before putting in an offer, was doing my homework about the neighborhood and house we decide to buy. Trulia gave me an average price per square foot for the neighborhood. That's useful to have. In our area, the county has a web site that gave me the square feet of the house and property, as well as what the current owners paid for the house. I can also look up what the owners mortgaged the property for. This will vary based on where you live, but it's probably worth poking around your county or municipality websites and see what you can come up with.
Having this information is important for a few reasons. I calculated for myself what the house 'should' be worth. I got a rough idea of what the current owner owed on the place using the mortgage information. I definitely wanted to make an offer I was confident meant the owner would not need to bring cash to the closing.
The first time we put an offer in on this house, there were 2 other offers, so we brought a good "what we think is fair" price. In general, though, I want to offer less than what I want to pay. The seller will probably want to counteroffer me, right? So start low. Great.
In our case, some other buyer initially put in a higher offer than we did, and 'got' the place. That was OK, we started looking at other places. Two months later, our agent called. The folks who put in the highest offer could not get a mortgage, so it was back on the market. Queue our reasonable, fair offer again, which we increased by a thousand bucks. After some negotiation, we landed at a price that was $5k over our very first offer, that was still totally within the range of "what I thought was a fair price for the house based on the information I had."
Going over what I had researched and decided is a fair price has a few implications. First off, if for some reason, we need to leave the house or the area sooner than we expected to, I wanted to make sure I could sell it to someone else without too much fuss. Pay more than the house is worth, and then we'll be the one bringing cash to the closing. Do not want! Also, having the most expensive house on our block means that I'm not going to get a good return on any improvements we make. We knew we wanted to things like build a new kitchen and upgrade a bathroom, and did not want to be in that situation either.
Wow, this was long winded. I did say how much I over research stuff earlier, though, so hey, what can I do. I should also point out that I am pretty sure I drove my husband nuts during this whole thing, by plying him with more information than he wanted. He is a little more "seat of my pants offer" than I am, though. Between us, it seems to have worked out.
I am pretty curious how other people went about figuring out where they wanted to live and what they wanted to spend, so if you have a different way of going about this, post a comment! I'm a data girl, so of course my process involves a lot of information gathering.
Monday, December 20, 2010
Back to Our Regularly Scheduled Construction!
Did you guys know they now make drywall lighter? Seriously 30%, and apparently it's not BS. Husband told me the he could pick up a 8' section with no effort, and the 12' ceiling sections went up awesome.
I am only super exited about this because it means that my drywalling is basically done. Two days and done! Now it needs to be primed (5 gallons of primer for this, says contractor father in law!) and painted.
Read more >>
 |
| srsly, it says this right on the sheetrock! |
Check it out.
 |
| Beautiful Sink Windows! |
 |
| Transoms / Clerestory Windows |
Also, crazy pro tip: want a counter depth fridge, but don't want to pay the extra coin and lose the fridge size? Contractor father in law and his buddy determined that we could recess the fridge into the wall! Awesome!!!
 |
| Hole in drywall for fridge |
 |
| Close up. |
I think we are getting 2 inches out of it. I think that it's more like 5 inches difference between regular and counter, but it should help a bit to make it look closer to counter depth. Really, I am mostly excited about having a bit more clearance in that section of the kitchen.
Woot!
Sunday, December 19, 2010
Cookie Day!
 |
| In the Oven! |
Every year, the Saturday before Christmas, my mother and I get together to bake ALL the cookies. OK, we are not really baking all of the cookies, but it's a ton of cookies. Depending on which ones we make, it ends up being something like 60-ish dozen. Everyone has their favorite cookie, and we have to make them all. We use them to take cookie trays to everywhere, work, parties, all the regular stuff.
Yesterday was Cookie Day. Mom woke up early (at like 6 am) and started making buckeyes and pecan tassies. I got to mom's house around 9 and we made peanut butter blossoms, snickerdoodles, russian tea cakes, toffee cookies, thumbprints, cut out cookies for my three year old to decorate, and candy cane cookies.
 |
| Before and After |
You'll have to forgive the terrible iphone pix. We were too excited to get to cookie day and forgot the real camera. Oh well. In recompense, I'll give you all the recipe.
Candy Cane Cookies
Ingredients
1 cup powdered sugar
1 cup butter
1 egg
1 1/2 teaspoons almond extract
1 teaspoon vanilla extract
2 1/2 cups flour
1 teaspoon of salt
red food coloring
Granulated sugar for sprinkling
Directions
- Preheat oven to 375
- Mix powdered sugar, butter, egg, and extracts in a bowl. (I used a mixer.)
- Sift in flour and salt and mix well.
- Divide the dough in half and color one half with the red food coloring.
- For each candy cane, take 1 teaspoon of each dough and roll into a 4 inch strip.
- Twist together and shape into a candy cane.
- Sprinkle with some granulated sugar and bake until very light. (About 9 minutes).
They look really cute on a cookie tray, and they are not too sweet, which you might appreciate if you had just baked 60 dozen cookies but still needed something to eat with your coffee.
I have not had much of a chance this weekend to post about the construction progress, which is really what I am supposed to be blogging about. Between cookie day and two Christmas parties, we're pretty beat. If you want a construction project fix, see this amusing picture of my current kitchen door, which opens to..... the drywall for the new kitchen.
 |
| Doorway to Nowhere. I feel like I'm in Coraline. |
When the new kitchen is done, this doorway will be blocked up and the existing kitchen will become a mudroom and powder room. It used to open onto a small deck.
I think the drywall taping and mudding and sanding will be done tomorrow (Woo!) and then we'll be opening up the windows from the dining room to be the doorway to the new space.
Super, super, super exciting.
Giveaway Day Winner
Hi Folks!
The winner of my giveaway day prize is melaniesenko@yahoo.ca, who I will be emailing shortly.
Read more >>
The winner of my giveaway day prize is melaniesenko@yahoo.ca, who I will be emailing shortly.
Thanks for playing, everyone! |
Thursday, December 16, 2010
Drywall is in the Building!
Drywall was delivered and is being hung!
This means we have passed all the inspections (5, I think) except for the final!
I can't even tell you how excited this has me.
(I'm posting from work, so I do not have pics. Having a job really gets in the way of your renovation projects. But it also pays for them, I guess.)
Read more >>
This means we have passed all the inspections (5, I think) except for the final!
I can't even tell you how excited this has me.
(I'm posting from work, so I do not have pics. Having a job really gets in the way of your renovation projects. But it also pays for them, I guess.)
Tuesday, December 14, 2010
Coquilles Saint-Jacques
Oh, hey, I said I'd post the coquilles saint-jacques recipe, and I totally forgot. Here it is, loosely interpreted from The New Legal Sea Foods Cookbook . (As in, this is what I did, but I make no claims that it will turn out like it's traditionally served, because I have never actually eaten this dish prepared by anyone but me.)
3 tablespoons of butter, divided
1/2 cup finely chopped sweet onion
1/3 cup seeded, diced tomato
2 pounds sea scallops, halved
1/2 cup dry white wine
2 tablespoons flour
about a cup of cream or half&half
1/4 cup grated parm
salt & fresh ground pepper
cayenne pepper
1 tablespoon chopped fresh parsley
Read more >>
3 tablespoons of butter, divided
1/2 cup finely chopped sweet onion
1/3 cup seeded, diced tomato
2 pounds sea scallops, halved
1/2 cup dry white wine
2 tablespoons flour
about a cup of cream or half&half
1/4 cup grated parm
salt & fresh ground pepper
cayenne pepper
1 tablespoon chopped fresh parsley
- Cook the onions in 1 tablespoon of butter. Stir in the tomatoes and cook for a few more minutes.
- Add the scallops and the wine. Cover the pan, lower the heat, and simmer for about 2 minutes. Remove from heat.
- In another pan, heat 2 tablespoons of the butter, and stir in the flour, cooking over low for about 2 minutes. Whisk in the cream or half&half and cook over medium low until the sauce is thick.
- Stir the cream mixture into the scallops mixture and add half of the parm, salt, pepper, and cayenne to taste.
- I cooked this in my big Le Creuset dutch oven, so instead of pouring the mixture into a buttered baking dish like the original recipe says, I just sprinkled the remaining cheese over top, chucked the whole thing in the oven for about ten minutes and served it in bowls with the parsley and some super crusty bread
By the way, this seemed pretty easy to me, but it sounds all french and exciting. It's totally worth a try for having people over for dinner.
Construction: Stuff is Happening
 |
| This looks much brighter than real life. |
 |
| This is closer to the right color. |
 |
| View from the sidewalk |
Construction always seems like you have nothing, then a ton of stuff really fast, then nothing, then a ton of stuff really fast. Repeat for as many months as your project takes.
I think part of that is that digging a big hole is not super exciting (unless you happen to be a 3 year old boy, in which case it is the best thing EVER), and neither is plumbing or electrical rough in. Framing, however, and drywall. Those things look like real progress. They're big! You can see them!
In any case, plumbing and electrical rough in and inspections have been happening lately at our place, so it has not seemed like there was a ton of progress, even though logically I realize that's all important stuff.
While the specialists work on that stuff, however, our contractors and my husband have been putting up siding. Lovely beautiful siding! Siding is progress!!!
I agonized over siding colors for a month. Classic white? Sage green? That beige color that seems really popular right now? Eventually, somehow, we ended up at red. The rationale is that it in brick red the addition would not be a big distracting cube of some random color from the street. In the last picture you can see the view from the sidewalk. It does not look *exactly* like the brick, but that's OK. I think it's less visually distracting because the colors are similar. I also don't think they are so close together that it looks like we were trying to match and slightly failed. (See also: wearing black pants and a black jacket from two different pant suits)
We've picked a bunch of things based on keeping the addition consistent with the rest of the house, so the red siding kind of made sense. In some cases, we were able to pick some elements that are both consistent with the house now, and consistent with what the house was like when it was built. (This is hard, because the house was built in 1924.) Unfortunately, money and time are always problems, so we get plain double-four siding instead of the faux cedar shake that I would have liked. (Though I saw that on our local eat & park restaurant, and it looked kinda bad, so I think I am happy with the double-four. Also, if I knew more about what double four meant besides "each board thingy has 2 - four inch horizontal, er, bits, I would tell you, but I totally don't.)
We got windows that look like three over one paned, because that's what the original windows in the house were. There are a few left in the house, and lots of our neighbors have them. (The previous owners replaced some with those grid-like mullions, which are fine, but don't really have the same feeling as the three over one.) We also got a solid wood front door with nice, straight angles. It's hard to know, but I suspect the original door would have been something similar.
We're not trying to recreate the house as it was in 1924, but rather to pick elements that seem right in the house, while not giving up modern conveniences. (For example, the three over one windows are modern flat easy to clean double hung windows that look paned and not all wood single paned. )
I am really digging the mock-clerestory windows on the side of the house pictured, by the way. I think they are secretly transoms for over a door, but I really wanted three high windows there (to bring in light but avoid having a view of the neighbors back yard), and those are what fit. Thank you father-in-law-contractor for thinking of that!
Yay Progress!
Now it's tie to watch frosty with the little one.
Monday, December 13, 2010
Handmade Holidays or Charlie Brown Tree?
 |
| Fridge and left side of dining room |
 |
| Right side of dining room |
So, our dining room is full of the cabinets, which we are not yet ready for, and the fridge, which needed to be replaced and does not fit in our existing, teeny kitchen. (Hence, the big kitchen project. We did not want to replace the fridge with another small one that fit in the little kitchen when we are like months away from a new kitchen.) This means, there is really no room for a Christmas Tree, because it really only fits in the dining room.
See the pictures of all the boxes. On both sides of the room! I told a friend that the were oppressive reminders of the enormous expense and my unrealized dreams. I was morose that day.
In any case, I got a head cold this weekend, and my husband took pity on me and brought me home a teeny little fiber optic tree. Adorable! Our ornaments are packed up, and not really the right size, so my son and I made some ornaments out of paper and ribbon. Husband and son put them up, and now we have a Christmas tree decorated with homemade ornaments.
 |
| Tree! |
(Yes, I do realize that all I did is punch paper and tie ribbons. I'm on cold meds. Let me have my gleeful success feeling until I'm back to normal.)
 |
| Paper & Ribbon! |
Range Wonderings: Gas or Electric?
As I've mentioned here zillions of times before, I am kind of obsessive about researching and worrying about things we might buy.
The new thing I am obsessing about lately is what range to get.
First off, I have kind of wanted a slide in, white range with a ceramic top because I have this idea that it's easy to clean. Kind of like this: (Bear with me, I am trying this amazon link thing for the first time.)
Anyway, now I am starting to freak out for a few reasons:
Read more >>
The new thing I am obsessing about lately is what range to get.
First off, I have kind of wanted a slide in, white range with a ceramic top because I have this idea that it's easy to clean. Kind of like this: (Bear with me, I am trying this amazon link thing for the first time.)
Anyway, now I am starting to freak out for a few reasons:
- Does a slide in need to have some kind of notch taken out on the countertop? Do I need to have the range before I get the countertop? Cause I was planning on just using my old gas one for a while and then replacing it later.
- I am moving from gas to electric. I have never cooked on an electric stove, but I also detest cleaning my gas stove. I have never had a gas stove that I felt came completely, spotlessly clean. That may be commentary on my skill as a housekeeper (yeah, I'm no good in that department), but I also don't want to spend a thousand bucks on something that I ultimately don't like
For the record, my brother and sister in law have a smooth electric stove, and were nice enough to let me come over and cook on it once, to see if I liked it. I made coquille st jacques, and it was fine. Fab, even. If people care, I can post the recipe later. And really, how much fancy gas-range cooking do I need?
In any case, we are having a gas and an electric line run to that spot, so I can dither and change my mind later. Aieee!
Sunday, December 12, 2010
Giveaway Day!

Edit: Woo! I'm in!
I submitted my request to be involved super, super, super late, so there is a good chance I will not be able to participate. But hopefully, the nice folks at sew, mama, sew will take pity on me. My house is a disaster, after all. I can't even walk into my craft room, and all my christmas baking will be taking place somewhere not at my home. *sob*
But soon that will all be over, and if I get to be involved, then I will be giving away.....

Two yards of whatever Anna Marie Horner is in stock at Sew Mama Sew (under $15 per yard, please). I will ship it to you direct from the store. This one is kinda luscious and makes me want to do something serious with it for the master bedroom, but you can pick another.
You want in? I want in, too. But if I get in, here will be the drill:
- Post a comment, get 1 one ticket
- Follow my blog, get 5 tickets
- Post something in your own blog, linking to my blog, get 10 tickets
After the closure date (December 17th), I'll put everyone's tickets into a virtual hat and randomly choose someone.
Mockups and Boards

So, I have not scanned in the kitchen layout that was made for us by our (really fabulous) kitchen layout designer at Home Depot, but I did find the photoshop top-down view I made of what I was looking for.
Turns out, I did a decent job, because I got almost exactly what I put here. Big differences are that the peninsula is going to be bar height, and not table height. (It will just look better all around.) Also, there is a pantry to the left of the fridge, which pushes the fridge over a bit, but still gives me the 3' of counter space I wanted on the end for the coffee bar. (Basically, that's where our coffee machine and toaster are going to hang out, so the are quick to get to, and away from the rest of the more cooking/baking oriented kitchen.)
Husband and I walked through the space last night. Father-in-law-contractor measured out where everything will go and drew it on the plywood, so we can get a feel for how it is going to work out. I still love it. I had to fiddle with cabinets and windows forever until I got a sink centered on that stretch of wall, under the large window, with the 12" cabinets on top, and the range centered on the back wall. I'm in love. I just need it to be complete!
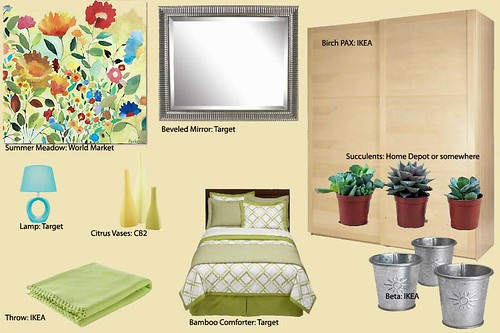
Also, when I was looking at all that, I noticed a mood board thingy I put together for a friend, who was lamenting the fact that all her bedroom furniture was ikea-colored (that light birch they make everything in.) Our old house, umple corner, was FULL of ikea birch, so I had a ton of ideas about how to make ikea birch look homey and fresh and happy and not like you were living in your first college apartment. Also, I made everything relatively cheap. Saved the high ticket stuff for small accessories, and stuck to Ikea/Target/World Market for the big stuff. I think it's pretty cute.
Fun!
Fireplace Fakeout

Note: Not our ugly fireplace. Some lovely, decorated fireplace from HGTV.
I dislike our fireplace. I have been trying my best to stop saying that I hate this or that sucks, because our child is a sponge, who last week told me he was waiting for something to arrive. Arrive? You are three! But let's stick with learning 'arrive' and 'have you noticed?' and not 'hate' or 'sucks'. So. Dislike. I mentioned what I'd like to do to it in a previous post.
Since then, a friend came over a few weekends ago and painted the fake brick the same bamboo shoot color as the rest of the downstairs. yay! (I would take pictures of that, but to be honest, our house is FULL of cabinets that were delivered and not yet installed. Like, seriously. I told another friend that they are oppressive reminders of my huge investment and unrealized dreams. So, no pics of the inside. Sorry. Next month, hopefully.)
Anyway, the green looks nice. I still have not done anything to cover the heinous fake brick that's facing the fireplace (and not the wall). I had this idea about tiling it with something pretty. That could still happen. but in the meantime, to satisfy my obsessive nature, I am researching awesome fake stuff I could do to our fireplace without taking out all the brick, doing whatever magic needs to happen to the chimney to make it useable again, and spending probably $5000. No, seriously, a fireplace insert, screen, brick/tile, centering the hole on the wall, and removing all the awful fake stuff, easily five grand.
Brick: Make your brick look like cooler brick. This brick-anew stuff looks kind of awesome. I really like the misty color, but I think the rest of my house lends itself to the taupe. I'm not sure if i would do the existing fake wall brick with one of these and then tile over the fireplace brick. I read that you can trowel joint compound over painted brick to make it look more like a textured wall and less like the sad, sad remnant of the 70s.

Fire: Man, gel fire? That's kind of cool. Also, it appears that you can do this ventless, without electricity or gas, and that it actually generates heat. So basically, a zero-installation solution to "the power is out and we're freezing". I get that it will not keep the whole house warm overnight, but hey, we could plop some mattresses down on the living room floor and probably not die. I'm just saying. Yeah, yeah, I'm probably delusional. I occasionally have these random thoughts of how well prepared we are for the lack of electricity and network access for long periods of time. I think husband would rather just buy a generator, but it's my blog, so there. Love!

Do you guys read any The Lettered Cottage? That chick had an awesome mantel roundup a while back. The link is for part 1, there's also a part 2.
Lots of lovely.
Keep warm, folks!
Subscribe to:
Posts (Atom)


